
I’m sure everyone in Lane County looks forward to the Junction City Scandinavian Festival just as much as I do. I love watching the little kids dance in their homemade costumes. I love looking through the craft displays. And I love the food, which I look forward to all year long with mouthwatering anticipation: fri-jos, meatballs, lefse, lemonade, and even “viking” corn dogs. But one of the most memorable foods I’ve ever been introduced to at the Scandi-Fest wasn’t sold at a cute booth with scalloped trim or served by a teenager in a folk costume. I first learned about fried peach pies from a woman who was visiting from the South. She told me all about them while we ate piping hot meat pies at the pop-up picnic tables behind the Faith Lutheran aebleskiver booth, and I’ve never forgotten them.I don’t remember her name, but I think I could pick her out of a lineup with some confidence. We chatted about the Loven Oven meat pies, about how some years they are good and some years they are great, and she told me all about her favorite kind of hand pie, a Southern specialty called a fried peach pie: juicy peaches picked at the height of summer ripeness, wrapped in a simple biscuit dough, and fried until crisp and golden. Of course, she didn’t have a recipe to share because people who cook the way she does—by feel—never need a recipe. I pressed for more details but didn’t get anything beyond an ingredient list: peaches, self-rising flour, and Crisco.
When I started researching how to make fried peach pies, I found hundreds of recipes, each a little different. Some called for a homemade peach filling while others called simply for fresh peaches. Crusts ranged from canned biscuit dough to homemade pie crust. I was a little overwhelmed with all the options and decided that the easiest way to get started was just to pick a few recipes and see if I liked any of them. I quickly narrowed down my options by saying no to any recipes that used store-bought filling or store-bought crust. Some of the recipes I tried had good filling but lousy crust. Others needed more flavor or more sweetness or more liquid in the dough to make it easier to work with. One set of pies completely disintegrated when they hit the oil, something I’ve never seen before.
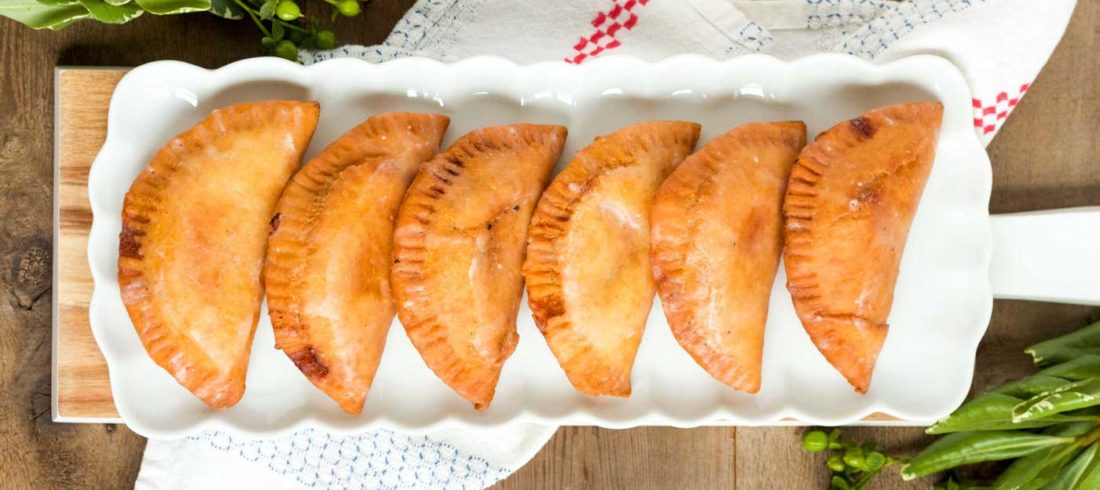
After several rounds of recipe testing and lots of tweaks, I finally have a winning recipe for fried peach pies! It has the best of everything: a filling that is sweet and lightly spiced with a deep, rich peach flavor; a crust that is easy to work with, tastes great, and fries up beautifully golden; and a layer of homemade glaze that adds the perfect amount of smooth sweetness to each and every delicious bite. I think my Southern friend would be proud.
Fried Peach Pies
Makes 16 pies
The recipe seems complicated, but it basically amounts to five easy steps: make the filling, make the dough, assemble the pies, fry them, and glaze them.
Ingredients
For the filling
2 pounds peeled, pitted, and sliced peaches, either fresh or frozen
1/2 cup granulated sugar
1/2 teaspoon cinnamon
1/4 teaspoon ginger
1/4 teaspoon nutmeg
1 teaspoon fresh lemon juice
For the dough
3 1/3 cups self-rising flour
2/3 cup shortening, chopped into small chunks and placed in the freezer
1 cup buttermilk
For the glaze
3 cups powdered sugar
3/4 cup milk
1 1/2 teaspoons vanilla
Directions
Begin by making the filling. Chop the peaches and combine them with the sugar in a medium saucepan. Bring the mixture to a simmer over medium-low heat until the mixture is fragrant and the sugar has dissolved. Be careful not to let the peach juices on the sides of the pan scorch. Once the peaches are simmering, turn up the heat to medium and continue to simmer the mixture until the peaches have mostly broken down and the mixture is thick and jammy, 15-20 minutes. Remove from heat, stir in the spices and lemon juice, and set aside to cool.
While the peach filling is cooling, make the dough. Combine self-rising flour and cold shortening in the bowl of a food processor and pulse until combined. The mixture should look sandy at this point. Add the buttermilk and continue processing until the dough comes together in one ball. Sprinkle more self-rising flour on the counter, and knead the dough until it is smooth. Divide the dough into 16 equal pieces. You can just eyeball it or you can use a kitchen scale to make sure the dough pieces are all equal. Roll each portion into a ball, then, working one at a time, use a rolling pin to roll each dough piece out into a thin circle about 5 inches across. Don’t worry if the edges are jagged; you’ll fix that later.
When the peach filling has cooled to room temperature, divide the filling evenly among the dough circles, placing the filling in the center of each circle. Get a small dish of water and, working on one pie at a time, use your fingertips to brush a thin layer of water halfway around the edge of a dough circle. Carefully fold the dough up and over the filling so that the dry side matches up with the wet side to form a half circle. Use your fingers to gently press the pie all around the rounded edge to seal it. Use a small paring knife to trim any excess or jagged dough pieces, to give the pie a smooth, clean edge, then press the tines of a fork around the sealed portion to further seal it and make it look nice. Place the finished pies on a cookie sheet.
Fill a heavy-bottomed pot or Dutch oven with 2 inches of peanut oil. Heat to between 350° and 375°F. Using a metal spatula or metal skimmer, gently lower the pies into the hot oil. Fry pies two at a time, for 1 minute 30 seconds per side. A set of tongs will help you flip the pies over more easily than the spatula or skimmer. When both sides of the pies are golden, use the spatula or skimmer to remove the pies from the oil and place them on a paper towel–lined cookie sheet to cool. Repeat with the remaining pies until all 16 pies have been fried.
While the pies are cooling, combine the powdered sugar, milk, and vanilla in a medium bowl. Whisk until smooth. When the pies are cool, spoon glaze over each pie, using the back of the spoon to spread the glaze evenly over the surface of each. Allow the glaze to dry until no longer shiny, then flip the pies over and glaze the other side. Allow the glaze to set completely before serving.